13 KiB
Configure IPsec/L2TP VPN Clients
Read this in other languages: English, 简体中文.
To connect using IPsec/XAuth mode, see: Configure IPsec/XAuth VPN Clients
After setting up your own VPN server, follow these steps to configure your devices. IPsec/L2TP is natively supported by Android, iOS, OS X, and Windows. There is no additional software to install. Setup should only take a few minutes. In case you are unable to connect, first check to make sure the VPN credentials were entered correctly.
You may also refer to this alternative setup guide with images by Tony Tran.
- Platforms
Windows
Windows 10 and 8.x:
- Right-click on the wireless/network icon in your system tray.
- Select Open Network and Sharing Center.
- Click Set up a new connection or network.
- Select Connect to a workplace and click Next.
- Click Use my Internet connection (VPN).
- Enter
Your VPN Server IPin the Internet address field. - Enter anything you like in the Destination name field, and then click Create.
- Return to Network and Sharing Center. On the left, click Change adapter settings.
- Right-click on the new VPN entry and choose Properties.
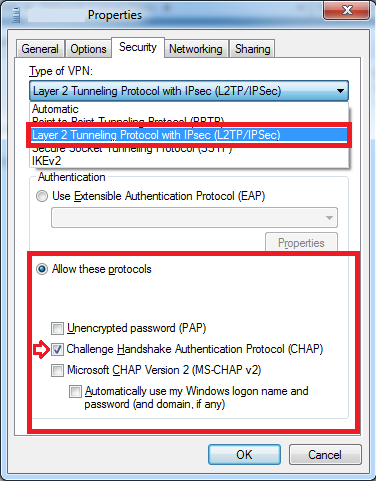
- Click the Security tab. Select "Layer 2 Tunneling Protocol with IPsec (L2TP/IPSec)" for the Type of VPN.
- Click Allow these protocols. Check "Challenge Handshake Authentication Protocol (CHAP)" and uncheck all others.
- Click the Advanced settings button.
- Select Use preshared key for authentication and enter
Your VPN IPsec PSKfor the Key. - Click OK to close the Advanced settings.
- Click OK to save the VPN connection details.
Windows 7, Vista and XP:
- Click on the Start Menu and go to the Control Panel.
- Go to the Network and Internet section.
- Click Network and Sharing Center.
- Click Set up a new connection or network.
- Select Connect to a workplace and click Next.
- Click Use my Internet connection (VPN).
- Enter
Your VPN Server IPin the Internet address field. - Enter anything you like in the Destination name field.
- Check the Don't connect now; just set it up so I can connect later checkbox.
- Click Next.
- Enter
Your VPN Usernamein the User name field. - Enter
Your VPN Passwordin the Password field. - Check the Remember this password checkbox.
- Click Create, and then Close.
- Return to Network and Sharing Center. On the left, click Change adapter settings.
- Right-click on the new VPN entry and choose Properties.
- Click the Options tab and uncheck Include Windows logon domain.
- Click the Security tab. Select "Layer 2 Tunneling Protocol with IPsec (L2TP/IPSec)" for the Type of VPN.
- Click Allow these protocols. Check "Challenge Handshake Authentication Protocol (CHAP)" and uncheck all others.
- Click the Advanced settings button.
- Select Use preshared key for authentication and enter
Your VPN IPsec PSKfor the Key. - Click OK to close the Advanced settings.
- Click OK to save the VPN connection details.
To connect to the VPN: Click on the wireless/network icon in your system tray, select the new VPN entry, and click Connect. If prompted, enter Your VPN Username and Password, then click OK. You can verify that your traffic is being routed properly by looking up your IP address on Google. It should say "Your public IP address is Your VPN Server IP".
If you get an error when trying to connect, see Troubleshooting.
OS X
- Open System Preferences and go to the Network section.
- Click the + button in the lower-left corner of the window.
- Select VPN from the Interface drop-down menu.
- Select L2TP over IPSec from the VPN Type drop-down menu.
- Enter anything you like for the Service Name.
- Click Create.
- Enter
Your VPN Server IPfor the Server Address. - Enter
Your VPN Usernamefor the Account Name. - Click the Authentication Settings button.
- In the User Authentication section, select the Password radio button and enter
Your VPN Password. - In the Machine Authentication section, select the Shared Secret radio button and enter
Your VPN IPsec PSK. - Click OK.
- Check the Show VPN status in menu bar checkbox.
- Click the Advanced button and make sure the Send all traffic over VPN connection checkbox is checked.
- Click the TCP/IP tab, and make sure Link-local only is selected in the Configure IPv6 section.
- Click OK to close the Advanced settings, and then click Apply to save the VPN connection information.
To connect to the VPN: Use the menu bar icon, or go to the Network section of System Preferences, select the VPN and choose Connect. You can verify that your traffic is being routed properly by looking up your IP address on Google. It should say "Your public IP address is Your VPN Server IP".
Android
- Launch the Settings application.
- Tap More... in the Wireless & Networks section.
- Tap VPN.
- Tap Add VPN Profile or the + icon at top-right of screen.
- Enter anything you like in the Name field.
- Select L2TP/IPSec PSK in the Type drop-down menu.
- Enter
Your VPN Server IPin the Server address field. - Enter
Your VPN IPsec PSKin the IPSec pre-shared key field. - Tap Save.
- Tap the new VPN connection.
- Enter
Your VPN Usernamein the Username field. - Enter
Your VPN Passwordin the Password field. - Check the Save account information checkbox.
- Tap Connect.
Note: If unable to connect using Android 6 (Marshmallow), try these workarounds:
- Tap the settings icon next to your VPN profile. Select "Show Advanced Options" and scroll down to the bottom. If the option "Backwards-compatible mode" exists, enable it and reconnect the VPN. If not, skip to step 2.
- (Note: Latest version of the VPN scripts already include these changes) Edit
/etc/ipsec.confon the VPN server and append,aes256-sha2_256to bothike=andphase2alg=lines. Then add a new linesha2-truncbug=yesimmediately after those. Indent lines with two spaces. Save the file and runservice ipsec restart. (Reference)
Once connected, you will see a VPN icon in the notification bar. You can verify that your traffic is being routed properly by looking up your IP address on Google. It should say "Your public IP address is Your VPN Server IP".
iOS
- Go to Settings -> General -> VPN.
- Tap Add VPN Configuration....
- Tap Type. Select L2TP and go back.
- Tap Description and enter anything you like.
- Tap Server and enter
Your VPN Server IP. - Tap Account and enter
Your VPN Username. - Tap Password and enter
Your VPN Password. - Tap Secret and enter
Your VPN IPsec PSK. - Make sure the Send All Traffic switch is ON.
- Tap Done.
- Slide the VPN switch ON.
Once connected, you will see a VPN icon in the status bar. You can verify that your traffic is being routed properly by looking up your IP address on Google. It should say "Your public IP address is Your VPN Server IP".
Chromebook
- If you haven't already, sign in to your Chromebook.
- Click the status area, where your account picture appears.
- Click Settings.
- In the Internet connection section, click Add connection.
- Click Add OpenVPN / L2TP.
- Enter
Your VPN Server IPfor the Server hostname. - Enter anything you like for the Service name.
- Make sure Provider type is L2TP/IPSec + pre-shared key.
- Enter
Your VPN IPsec PSKfor the Pre-shared key. - Enter
Your VPN Usernamefor the Username. - Enter
Your VPN Passwordfor the Password. - Click Connect.
Once connected, you will see a VPN icon overlay on the network status icon. You can verify that your traffic is being routed properly by looking up your IP address on Google. It should say "Your public IP address is Your VPN Server IP".
Linux
Ubuntu and Debian:
Follow the steps in this tutorial. Some corrections are required:
-
In
xl2tpd.conf, remove the line# your vpn server goes here. -
In
options.l2tpd.client, replacerequire-mschap-v2withrequire-chap. -
Replace
sudo echo "c XXX-YOUR-CONNECTION-NAME-XXX <user> <pass>" > /var/run/xl2tpd/l2tp-controlwith:echo "c XXX-YOUR-CONNECTION-NAME-XXX <user> <pass>" | sudo tee /var/run/xl2tpd/l2tp-control -
Replace the last command
sudo route add -net default gw <vpn server local ip>with:sudo route add default dev ppp0If there is an error, check the output of
ifconfigand replaceppp0above withppp1, etc.
Verify that your traffic is being routed properly:
wget -qO- http://whatismyip.akamai.com; echo
The above command should return Your VPN Server IP.
To stop routing traffic via the VPN server:
sudo route del default dev ppp0
CentOS and Fedora:
Refer to the Ubuntu/Debian section above, with these changes:
- Use
yuminstead ofapt-getto install packages. - In these systems, the
ipseccommand has been renamed tostrongswan. - The files
ipsec.confandipsec.secretsshould be saved under/etc/strongswan.
Other Linux:
If your system provides the strongswan package, refer to the two sections above.
Troubleshooting
Windows Error 809
The network connection between your computer and the VPN server could not be established because the remote server is not responding.
To fix this error, a one-time registry change is required because the VPN server and/or client is behind NAT (e.g. home router). Refer to the linked web page, or run the following from an elevated command prompt. When finished, reboot your PC.
-
For Windows Vista, 7, 8 and 10
REG ADD HKLM\SYSTEM\CurrentControlSet\Services\PolicyAgent /v AssumeUDPEncapsulationContextOnSendRule /t REG_DWORD /d 0x2 /f -
For Windows XP ONLY
REG ADD HKLM\SYSTEM\CurrentControlSet\Services\IPSec /v AssumeUDPEncapsulationContextOnSendRule /t REG_DWORD /d 0x2 /f
Windows Error 628
The connection was terminated by the remote computer before it could be completed.
To fix this error, please follow these steps:
- Right-click on the wireless/network icon in system tray, select Open Network and Sharing Center.
- On the left, click Change adapter settings. Right-click on the new VPN and choose Properties.
- Click the Security tab. Select "Layer 2 Tunneling Protocol with IPsec (L2TP/IPSec)" for Type of VPN.
- Click Allow these protocols. Check "Challenge Handshake Authentication Protocol (CHAP)" and uncheck all others.
- Click OK to save the VPN connection details.
Other Errors
Please refer to this document for more troubleshooting tips.
Credits
This document was adapted from the Streisand project by Joshua Lund and contributors.
License
Copyright (C) 2016 Lin Song
Based on the work of Joshua Lund (Copyright 2014-2016)
This program is free software: you can redistribute it and/or modify it under the terms of the GNU General Public License as published by the Free Software Foundation, either version 3 of the License, or (at your option) any later version.
This program is distributed in the hope that it will be useful, but WITHOUT ANY WARRANTY; without even the implied warranty of MERCHANTABILITY or FITNESS FOR A PARTICULAR PURPOSE. See the GNU General Public License for more details.